Hiển thị các bài đăng có nhãn Contact Form for Blogger. Hiển thị tất cả bài đăng

Thứ Ba, 31 tháng 12, 2013

Google Released Widget of Contact Form for Blogger

This news must break all blogger fans’s hearts. An Official Contact Form for Blogger was released on day ago.
As you know, contact form for Blogger is a weak point of this platform, may be make you confuse before choose it to start a blog. Before this release, we must create an third party contact form for Blogger (common from google docs) and it always make use tired.
But now, all were gone. We are free to make our beautiful and truely contact form for Blogger with real HTML code. Love love love it

Add Contact form for Blogger by widget

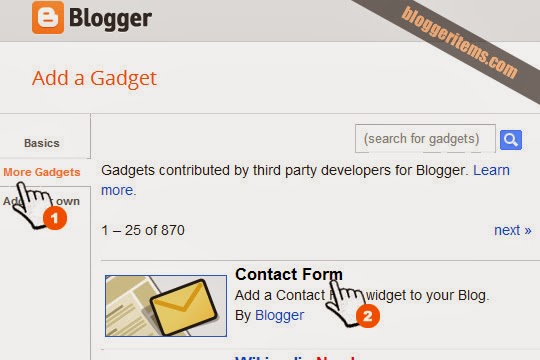
Access your blog layout, click Add a Gadget link on any section. When “Add a Gadget” was shown, click More Gadgets, you will see the contact form widget (with yellow email icon) on the top.
Then click on the title “Contact form” (or on Plus button at right hand) to add Contact form for Blogger. May be you will be ask to input title for the gadget, just input one and click Save.

Add widget Contact form for Blogger
Now, turn to your blog home page and watch Contact form for Blogger in display
Contact form for Blogger in action
You can find the HTML code of contact form for Blogger as below, and try to use CSS to make it become more beautiful
<form name="contact-form">
<p></p>Name
<br>
<input class="contact-form-name" id="ContactForm1_contact-form-name" name="name" size="30" type="text" value="">
<p></p>
Email
<span style="font-weight: bolder;">*</span>
<br>
<input class="contact-form-email" id="ContactForm1_contact-form-email" name="email" size="30" type="text" value="">
<p></p>Message
<span style="font-weight: bolder;">*</span>
<br>
<textarea class="contact-form-email-message" cols="25" id="ContactForm1_contact-form-email-message" name="email-message" rows="5"></textarea>
<p></p>
<input class="contact-form-button contact-form-button-submit" id="ContactForm1_contact-form-submit" type="button" value="Send">
<p></p>
<div style="text-align: center; max-width: 222px; width: 100%">
<p class="contact-form-error-message" id="ContactForm1_contact-form-error-message"></p>
<p class="contact-form-success-message" id="ContactForm1_contact-form-success-message"></p>
</div>
</form>


Contact Form for Blogger on Static Page with CSS only


We knew, Google released Contact Form for Blogger last week. And I received many requests to make a contact form for Blogger on Static page instead widget, because widget is on side bar and it’s not polite to contact or not friendly with visitors who usually contact us from a stand alone page.
Now, I have a workaround solution will help you display contact form for Blogger on static page with css only. I will release many tips to make contact form with js, jquery, but now, please enjoy with CSS first

Step 1: Add contact form gadget

Access your blog Layout. Click on any Add a Gadget link. An Add a Gadget window will be shown, click on More Gadgets, and choose add Contact Form.
add-contact-form-for-blogger
Add Contact form for Blogger by gadget
add-contact-form-for-blogger-window
Add contact form for Blogger window
On Configure Contact Form Widget window, click Save button.
add-contact-form-for-blogger-save
Then just save your contact form
After added Contact form gadget, please drag and drop it below Blog Posts gadget, then click Save arrangement button.
drag-drop-contact-form-for-blogger
Drag and Drop contact gadget under Blog Posts and Save arrangement

Step 2: Hide contact form widget

Access your blog Template, and click Edit HTML. In HTML editor, find
]]></b:skin>
Then, insert before with the code
.widget.ContactForm {
display: none;
}
template-contact-form-for-blogger
Open template editor and paste the code

Step 3: Make contact page

Access Page, then create a blank page with a name mean “Contact” or any text you want.
add-page-contact-form-for-blogger
Add Contact Page
In page editor, switch to HTML mode and paste the below code into content field
<style type="text/css">
.widget.ContactForm {
display: block;
}
.post-footer {
display: none;
}
#blog-pager {
display: none;
}
.blog-feeds {
display: none;
}
.widget.ContactForm .title {
display: none;
}
.widget.ContactForm * {
max-width: 100%;
}
</style>
Then Publish the page.
publish-page-form-for-blogger-window
Add code to static page
Now, you can access your new page and enjoy your contact form.
result
And Contact form for Blogger in action on static page

Contact Form for Blogger Static Page with jQuery


As you know, I posted a tip: Contact form for Blogger on static page with css before, and now, I will show you how to do that tip with jQuery.
What’s advantage of jQuery? Yes, right question. A big advantage of jQuery than CSS is that it allows you place Contact form any where you want. And this tip is base for my futures about Customize Contact form for Blogger.

Step 1: Add jQuery and Contact widget

Please read “Add jQuery to your Blogger blog“. Remember, if you already added the jQuery before, and now, you add it again, your blog will be broken with javascript error, so please check and follow exactly what I wrote in the above link.
Next, please read my Blog post to know how to Add Contact Widget to your blog.

Step 2: Add CSS and Javascript

Please access your blog dashboard, choose Template, then click Edit HTML button. Now, copy and paste the below code before ]]></b:skin>
.ContactForm {
display: none;
}
.blogger-items-contact .ContactForm {
display: block;
}
.widget.ContactForm .title {
display: none;
}
.widget.ContactForm * {
max-width: 100%;
}
Next, please copy and paste the below code before </body> tag:
<script type='text/javascript'>
//<![CDATA[
$('.ContactForm').appendTo('.blogger-items-contact');
//]]>
</script>
Now, you can click Save template.

Step 3: Add shortcode

Now, you can place below shortcode at any where you want to display contact form:
 <div class="blogger-items-contact"></div>
In this example, I will create a static page. Now, choose Pages menu on your blog dashboard, and click New page and choose Blank page.
add-static-page-contact-form-for-blogger
Create static page to add Contact form for Blogger
In post editor, switch to HTML mode and paste the above code to content field. Then click Publish.
javascript-code-static-page-contact-form-for-blogger
Contact Form for Blogger shotcode
Result of your contact form may be like below:
result-of-contact-form-for-blogger
Result of Contact Form for Blogger

Floating Contact Form for Blogger


If you don’t want to create static page to insert contact form for Blogger as my tip, or also don’t want to place it at right sidebar. So this tip may be your perfect choice, create a floating box of contact form.

Screen shot

floating-contact-form-for-blogger-demo

Video demo


How to create it

Add jQuery and Contact Form Gadget

If your blog has no jQuery before, just read my tutorial.
I also wrote an article to help you figure out how to add a Contact Form gadget for your blog. If you did not add one, please read the tutorial.

Add Css and Javascript

Please paste the below code before ]]></b:skin> in your blogger template
/*Floating Contact Form by BloggerItems.com*/
.ContactForm, .ContactForm .title {
display: none;
}
.floating-ct {
position: fixed;
width: 250px;
right: 0;
bottom: 0;
z-index: 999;
}
.floating-ct-head a {
padding: 5px 10px;
background: #09f;
color: white;
font-weight: bold;
display: inline-block;
*display: block;
zoom: 1;
}
.floating-ct-body {
height: 285px;
background: white;
border: 1px solid #09f;
padding: 10px;
display: none;
}
.floating-ct-head {
text-align: right;
}
.floating-ct-body .ContactForm {
margin: 0;
display: block!important;
}
Then paste the below code before </body> tag in your template
<script type='text/javascript'>
//<![CDATA[
/*Floating Contact Form by BloggerItems.com*/
$('body').append('<div class="floating-ct"><div class="floating-ct-head"><a href="#no-move">Contact</a></div><div class="floating-ct-body"></div></div>');
$('.ContactForm').appendTo('.floating-ct-body');
var slide_up_ct = false;
$('.floating-ct-head a').click(function(){
if (!slide_up_ct) {
slide_up_ct = true;
$('.floating-ct-body').slideDown();
} else {
slide_up_ct = false;
$('.floating-ct-body').slideUp();
}
});
//]]>
</script>